


问题: 讲一下 cocoapods 相关内容.
整体流程基于 cocoapods (1.11.3)
-
cocoapods install的底层原理与流程.
-
pod install 和 pod update 的区别
-
Manifest.lock 和 Podfile.lock 的区别
-
cocoapods的组成部分详解.
问题: pod install 和 pod update 的区别
总结 :
pod install 与 pod update 的核心区别就在于对Podfile.lock的操作.
pod install 只会安装 Podfile 中新改变的依赖,并且会:优先遵循 Podfile 里指定的版本信息;其次遵循 Podfile.lock 里指定的版本信息来安装对应的依赖库。比如:下面在 Podfile 里没指定 iRate 的版本,但是 Podfile.lock 里指定了 iRate 的版本是 1.11.1,那么即使现在有最新的 1.11.4,最终也会安装 1.11.1。但是如果 Podfile 里指定了 iRate 版本是 1.11.3,那么则会安装 1.11.3,并更新 Podfile.lock 里的信息。
而 pod update 却直接是根据 Podfile 文件中依赖的版本配置进行下载 等操作,然后更新 Podfile.lock.
pod install
当你在项目中的Podfile配置文件中添加、删除、或者更新版本号时使用,也就是用来安装新Pod,删除pod,或者根据你设置的pod版本号来安装
安装完后,会自动生成Podfile.lock文件,该文件记录着Podfile配置的所有Pod的版本信息,依赖库信息,和pod库的checksum(校验码)
所以当你下次运行pod install时,已经安装过的pod就不会再次去下载安装,也不会更新已有的pod库。
pod update
也就是当我们想把已有的库更新到最新版本时使用。比如当前的AFNetworking的版本时3.2.1,那么最新版本时4.0.1,通过pod install并不会更新库到最新版本,而pod update却可以更新到最新的版本'AFNetworking', '~>4.0.1'
问题: Manifest.lock 和 Podfile.lock 的区别
Podfile.lock 是用于锁住依赖的版本,会随着 pod install 与 pod update 而更新.建议加入版本控制.
Manifest.lock 是 Podfile.lock 的副本,每次只要生成 Podfile.lock 时就会生成一个一样的 Manifest.lock 存储在 Pods 文件夹下。在每次项目 Build 的时候,会跑一下脚本检查一下 Podfile.lock 和 Manifest.lock 是否一致:
diff "${PODS_PODFILE_DIR_PATH}/Podfile.lock" "${PODS_ROOT}/Manifest.lock" > /dev/null
if [ $? != 0 ] ; then
    # print error to STDERR
    echo "error: The sandbox is not in sync with the Podfile.lock. Run 'pod install' or update your CocoaPods installation." >&2
    exit 1
fi
# This output is used by Xcode 'outputs' to avoid re-running this script phase.
echo "SUCCESS" > "${SCRIPT_OUTPUT_FILE_0}"
由于 Manifest.lock 是存放在Pod文件中,不受版本控制,但是Podfile.lock受版本控制,两者一旦出现不同,也就是Pod依赖三方的版本不同就会立马报错,从而规避一些隐藏问题.
问题: 讲一下cocoapods install的底层原理与流程.
整体流程基于 cocoapods (1.11.3)
当使用 pod install --verbose,我们可以看到一下内容.
xxx@xxxdeMacBook-Pro CocoaPodsDemo % pod install --verbose
  Preparing

Analyzing dependencies

Inspecting targets to integrate
  Using `ARCHS` setting to build architectures of target
  `Pods-defaults-CocoaPodsDemo `: (``)

Finding Podfile changes
  - AFNetworking

Resolving dependencies of `Podfile`
  CDN: trunk Relative path: CocoaPods-version.yml exists! Returning local
  because checking is only perfomed in repo update

Comparing resolved specification to the sandbox manifest
  - AFNetworking

Downloading dependencies

-> Using AFNetworking (3.2.1)
  - Running pre install hooks

Generating Pods project
  - Creating Pods project
  - Installing files into Pods project
    - Adding source files
    - Adding frameworks
    - Adding libraries
    - Adding resources
    - Linking headers
  - Installing Pod Targets
    - Installing target `AFNetworking` iOS 7.0
      - Generating dummy source at `Pods/Target Support
      Files/AFNetworking/AFNetworking-dummy.m`
  - Generating deterministic UUIDs
  - Stabilizing target UUIDs
  - Running post install hooks
    - Podfile
  - Writing Xcode project file to `Pods/Pods.xcodeproj`
  Cleaning up sandbox directory

Integrating client project

Integrating target `Pods-defaults-CocoaPodsDemo ` (`CocoaPodsDemo.xcodeproj` project)
  - Running post integrate hooks
  - Writing Lockfile in `Podfile.lock`
  - Writing Manifest in `Pods/Manifest.lock`
  CDN: trunk Relative path: CocoaPods-version.yml exists! Returning local
  because checking is only perfomed in repo update

-> Pod installation complete! There are 1 dependencies from the Podfile and 1 total pods installed.
cocoapods install的流程示意图如下所示.
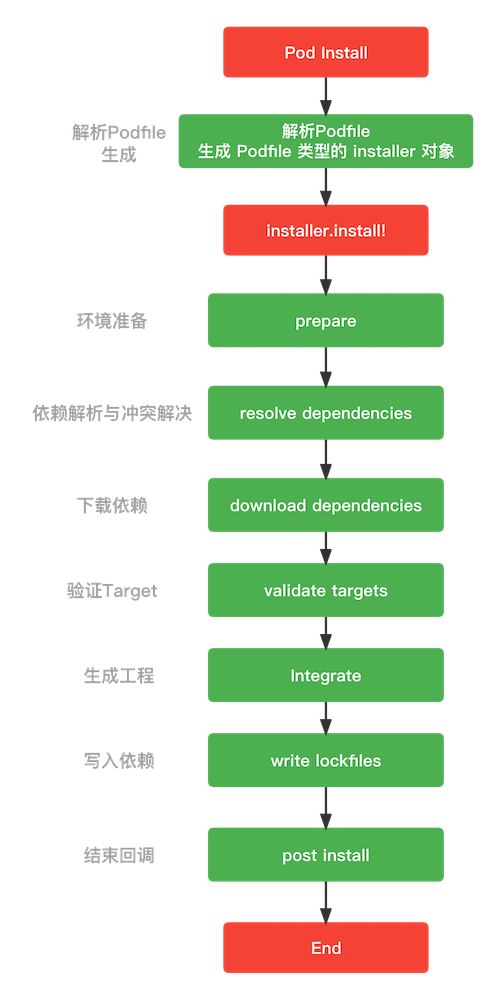
cocoapods install的底层主要有以下个步骤,如下所示
-
pod install的命令调用
-
解析Podfile文件, 生成Podfile对象
-
解决依赖冲突
-
下载依赖
-
验证Target
-
创建 Pod.xcodeproj 工程
-
集成 workspace
-
写入依赖
-
结束回调
pod install的命令调用
首先,我们需要先找到pod命令的安装路径. 在终端使用 which pod 命令即可.
(base) dong@bogon ~ % which pod
/usr/local/bin/pod
当我们拿到 pod 命令的路径时,就可以在终端使用 cat /usr/local/bin/pod 来查看 pod 命令具体做了些什么工作.
cat /usr/local/bin/pod
命令行就会输出如下信息. 由于Cocoapods是由 Gem 安装的, 所以下面的这个脚本主要是做命令转发. Gem.activate_bin_path 与 Gem.bin_path 主要是用来查找Cocoapods的安装目录 cocoapods/bin .最终加载该目录下的 pod脚本文件.
#!/usr/local/opt/ruby/bin/ruby
#
# This file was generated by RubyGems.
#
# The application 'cocoapods' is installed as part of a gem, and
# this file is here to facilitate running it.
#

require 'rubygems'

Gem.use_gemdeps

version = ">= 0.a"

str = ARGV.first
if str
  str = str.b[/\A_(.*)_\z/, 1]
  if str and Gem::Version.correct?(str)
    version = str
    ARGV.shift
  end
end

if Gem.respond_to?(:activate_bin_path)
load Gem.activate_bin_path('cocoapods', 'pod', version)
else
gem "cocoapods", version
load Gem.bin_path("cocoapods", "pod", version)
end
那么如何查找 cocoapods 的相关脚本文件呢, 可以通过 gem info 命令查看所有的组件位置,我们就可以从中找到对应的路径.如下图所示.
注: 实际上是在 /usr/local/lib/ruby/gems/3.1.0/gems 路径中.
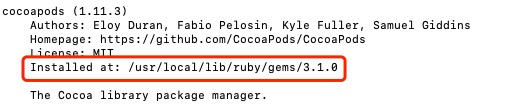
然后我们找到 Cocoapods组件,找到bin目录其中的 pod 脚本.
#!/usr/bin/env ruby

# ... 忽略一些对于编码处理的代码

require 'cocoapods'

if profile_filename = ENV['COCOAPODS_PROFILE']
  require 'ruby-prof'
  # 依据配置文件类型加载不同的 reporter 解析器
  # ...
  File.open(profile_filename, 'w') do |io|
    reporter.new(RubyProf.profile { Pod::Command.run(ARGV) }).print(io)
  end
else
  Pod::Command.run(ARGV)
end
在 Pod 脚本的最后阶段调用了 Pod::Command.run(ARGV), 实际上内部会生成一个CLAide::Command对象,然后开始 CLAida命令解析. 最终会调用到 Command Class 的 run 方式.
所以, pod install 命令会最终到达 cocoapods-1.11.3/lib/cocoapods/command/install.rb 中. 代码实例如下所示.
module Pod
  class Command
    class Install < Command

      # ... 省略 ... #

      def run
        verify_podfile_exists!
        installer = installer_for_config
        installer.repo_update = repo_update?(:default => false)
        installer.update = false
        installer.deployment = @deployment
        installer.clean_install = @clean_install
        installer.install!
      end
    end
  end
end
Install 继承于 Command类. Command类所在文件的路径为cocoapods-1.11.3/lib/cocoapods/command.rb
Install类在run方法中主要做的事情有这些.
- 验证podfile.
- 生成installer对象.
- installer对象属性设置.
- install! 方法的调用.
解析Podfile文件, 生成Podfile对象
生成Podfile对象的核心代码入口就在 Install类run方法 中.
installer = installer_for_config
先前说了
Install 继承于 Command 类. 所以 installer_for_config 的代码实现在 Command 类中.
Command类所在文件的路径为cocoapods-1.11.3/lib/cocoapods/command.rb
    # ... 省略 ... #

module Pod
  class Command < CLAide::Command

    # ... 省略 ... #

    def installer_for_config
      Installer.new(config.sandbox, config.podfile, config.lockfile)
    end
  end
end
最终会调用 Config类的podfile方法 ,生成一个podfile实例. 路径为 cocoapods-1.11.3/lib/cocoapods/config.rb
    # ... 省略 ... #

module Pod
  class Config

    # ... 省略 ... #

    def podfile
      @podfile ||= Podfile.from_file(podfile_path) if podfile_path
    end

    # ... 省略 ... #

end
Podfile.from_file 是调用了Cocoapods-Core中 Podfile 的类方法. 路径为 cocoapods-core-1.11.3/lib/cocoapods-core/podfile.rb
module Pod

  class Podfile

    include Pod::Podfile::DSL

    # ... 省略 ... #

    def self.from_file(path)
      path = Pathname.new(path)
      unless path.exist?
        raise Informative, "No Podfile exists at path `#{path}`."
      end

      case path.extname
      when '', '.podfile', '.rb'
        Podfile.from_ruby(path)
      when '.yaml'
        Podfile.from_yaml(path)
      else
        raise Informative, "Unsupported Podfile format `#{path}`."
      end
    end

    # ... 省略 ... #

end
from_file(path) 会根据不同的后缀进行不同的调用路径. 我们由此可以看到它是支持ruby类型和yaml两种类型的. 逻辑代码如下所示.
case path.extname
when '', '.podfile', '.rb'
Podfile.from_ruby(path)
when '.yaml'
Podfile.from_yaml(path)
else
raise Informative, "Unsupported Podfile format `#{path}`."
end
from_ruby(path) 会从文件中读取数据, 然后使用 eval 直接把文件的内容当做Ruby代码进行执行. 逻辑代码如下所示.
    def self.from_ruby(path, contents = nil)
      contents ||= File.open(path, 'r:utf-8', &:read)

      # ... 省略 ... #

      podfile = Podfile.new(path) do
        begin
          eval(contents, nil, path.to_s)
        rescue Exception => e
          message = "Invalid `#{path.basename}` file: #{e.message}"
          raise DSLError.new(message, path, e, contents)
        end
      end
      podfile
    end
在Podfile这个类的顶部代码中,通过Ruby的 Mixin混入形式来混入DSL. 这是Podfile文件的代码执行所需要的上下文. 代码如下所示.
module Pod
  class Podfile

    include Pod::Podfile::DSL

    # ... 省略 ... #

  end
end
Podfile所有的定义方法都是在这个DSL类中. 路径为 cocoapods-core-1.11.3/lib/cocoapods-core/podfile/dsl.rb
module Pod
  class Podfile
	module DSL
	  def pod(name = nil, *requirements) end
	  def target(name, options = nil) end
	  def platform(name, target = nil) end
	  def inhibit_all_warnings! end
	  def use_frameworks!(flag = true) end
	  def source(source) end
	  # ... 省略 ... #
	end
  end
end
install! 总入口方法简介
当完成Podfile对象的构建时,就会进行 installer.install!. 路径为 /cocoapods-1.11.3/lib/cocoapods/installer.rb
module Pod
  class Installer
    def install!
      prepare # 环境准备工作
      resolve_dependencies # 解析依赖,解决依赖冲突
      download_dependencies # 下载依赖
      validate_targets # 验证Target
      if installation_options.skip_pods_project_generation?
        show_skip_pods_project_generation_message
      else
        integrate # 生成工程文件
      end
      write_lockfiles # 写入依赖
      perform_post_install_actions # 结束回调
    end
  end
end
prepare 环境准备
在prepare阶段会将Cocoapods的所需环境准备好,包含版本一致性、结构目录以及pre-install的装载插件全部取出,并执行对应的 pre-install 的 hooks.
    def prepare
      # 如果是在 Pods 目录下,那么直接停止
      if Dir.pwd.start_with?(sandbox.root.to_path)
        message = 'Command should be run from a directory outside Pods directory.'
        message << "\n\n\tCurrent directory is #{UI.path(Pathname.pwd)}\n"
        raise Informative, message
      end
      # 控制台输出 Preparing
      UI.message 'Preparing' do
        # 如果lock 文件的 Cocoapods 主版本和当前版本不同, 将以新版本的配置对 xcodeproj进行更新
        deintegrate_if_different_major_version
        # 对 sandbox(Pods) 目录建立子目录结构
        sandbox.prepare
        # 检测 PluginManager 是否有 pre-install 的 plugin
        ensure_plugins_are_installed!
        # 执行插件中 pre-install 的 所有 hooks 方法.
        run_plugins_pre_install_hooks
      end
    end
resolve_dependencies 依赖解析与冲突解决
当环境准备完成之后, 就需要分析依赖和解决依赖中子依赖冲突问题.
依赖解析过程就是通过Podfile 、 Podfile.lock 与 沙盒中得 manifest 生成 Analyzer 对象.
Analyzer对象内部会根据 Molinillo (内部是根据 Molinillo::DependencyGraph 图算法) 解析得到一张关系依赖表.
当CocoaPods拿到关系依赖表时,最终会在specs_by_target函数中根据不同的Target对所有的Specification进行分组.
    def resolve_dependencies
      # 获取Sources
      plugin_sources = run_source_provider_hooks
      # 生成Analyzer,内部生成
      analyzer = create_analyzer(plugin_sources)

      # 如果带有 repo_update 标记
      UI.section 'Updating local specs repositories' do
        # 执行 Analyzer 的更新 Repo 操作
        analyzer.update_repositories
      end if repo_update?

      #
      UI.section 'Analyzing dependencies' do
        # 从 analyzer 取出最新的分析结果,@analysis_result,@aggregate_targets,@pod_targets
        analyze(analyzer)
        validate_build_configurations
      end

      # 如果 deployment? 为 true,会验证 podfile & lockfile 是否需要更新
      UI.section 'Verifying no changes' do
        verify_no_podfile_changes!
        verify_no_lockfile_changes!
      end if deployment?

      analyzer
    end
细节点:
-
Analyzer内部可以获取很多解析信息,例如Podfile的分析结构,还可以通过 specs_by_target 来查看各个target相关的 specs.
-
analyze函数中有一个 pre_download 的阶段, 即为
pod install --verbose下看到的Fetching external sources. 属于依赖解析阶段,并非依赖下载阶段.pre_download 阶段的主要作用,当系统在默认的Source环境中不能拿到对应 specs, 需要直接访问我们的Git地址下载仓库的zip包,拿到里面的podspec文件,然后进行对比.
download dependencies 下载依赖
download_dependencies 是依赖下载模块的入口.
    def download_dependencies
      # 控制台输出 Downloading dependencies
      UI.section 'Downloading dependencies' do
        # 构造 Pod Source Installer
        install_pod_sources
        # 执行 podfile 中 pre_install 相关的所有的 hooks
        run_podfile_pre_install_hooks
        # 根据配置清理 pod sources 信息, 主要清理无用的 platform 信息
        clean_pod_sources
      end
    end
install_pod_sources 它会底层通过调用 cocoapods-downloader 组件,当Pod对应的Source下载到本地.
整体代码如下所示,其中代码注释已经做好.
    def install_pod_sources
      @installed_specs = []
      # pods_to_install的沙盒状态设置为 added与changed
      pods_to_install = sandbox_state.added | sandbox_state.changed
      title_options = { :verbose_prefix => '-> '.green }
      # 将 Podfile 解析,然后以名称排序,最后进行迭代遍历
      root_specs.sort_by(&:name).each do |spec|
        # 判断当前是否已经添加了spec.name的依赖
        if pods_to_install.include?(spec.name)
          # 如果是 changed 状态并且 manifest 已经有记录
          if sandbox_state.changed.include?(spec.name) && sandbox.manifest
            # 当前版本号
            current_version = spec.version

            # 先前版本号
            previous_version = sandbox.manifest.version(spec.name)

            # 版本号是否需要改变
            has_changed_version = current_version != previous_version

            # 找到第一个包含spec.name的Pod 获取对应的Repo, 其实就是find方法.
            current_repo = analysis_result.specs_by_source.detect { |key, values| break key if values.map(&:name).include?(spec.name) }

            # 获取当前的仓库
            current_repo &&= (Pod::TrunkSource::TRUNK_REPO_NAME if current_repo.name == Pod::TrunkSource::TRUNK_REPO_NAME) || current_repo.url || current_repo.name

            # 获取之前的仓库
            previous_spec_repo = sandbox.manifest.spec_repo(spec.name)

            # 判断仓库是否有变更
            has_changed_repo = !previous_spec_repo.nil? && current_repo && !current_repo.casecmp(previous_spec_repo).zero?

            title = "" ## 输出上面详细的变更信息(假设满足下面的条件)
            # 假设依赖的没有版本改变,但是仓库Repo信息发生了改变
            if !has_changed_version && has_changed_repo
          else
            # 非更改状态,输出信息直接设置为 Installing xxx
            title = "Installing #{spec}"
          end
          # 控制台输出输出title的输出信息
          UI.titled_section(title.green, title_options) do
            # 通过name拿到对应的installer,并且添加到数组 @pod_installers 中.
            install_source_of_pod(spec.name)
          end
        else
          # 直接输出 Using xxx 到控制台
          UI.section("Using #{spec}", title_options[:verbose_prefix]) do
            # 根据 sandbox, spec的 platform信息生成Installer实例,并且添加到 @pod_installers 中.
            create_pod_installer(spec.name)
          end
        end
      end
    end
install_pod_sources 在一开始的 root_specs 实际上是一个方法,用来通过 analysis_result 获取所有的spec.代码如下所示.
def root_specs
  analysis_result.specifications.map(&:root).uniq
end
通过上述 install_pod_sources 方法最终执行到两个逻辑分支.一个是 install_source_of_pod; 另外一个是 create_pod_installer.
下面我们分别来看一下两个函数都做了哪些工作. 首先是 create_pod_installer.
# 通过缓存返回 PodSourceInstaller 实例
def create_pod_installer(pod_name)
    specs_by_platform = specs_for_pod(pod_name)
    # 当通过 pod_name 无法找到对应的 pod_target 或 platform 配置,主动抛出错误信息
    if specs_by_platform.empty?
        requiring_targets = pod_targets.select { |pt| pt.recursive_dependent_targets.any? { |dt| dt.pod_name == pod_name } }
        # message = "..."
        raise StandardError, message
    end
    # 通过 sandbox, specs 的 platform 信息生成 Installer 实例
    pod_installer = PodSourceInstaller.new(sandbox, podfile, specs_by_platform, :can_cache => installation_options.clean?)
    pod_installers << pod_installer
    pod_installer
end
install_source_of_pod 内部依然会调用 create_pod_installer, 然后返回PodSourceInstaller实例对象.
# 如果 resolver 声明一个 Pod 已经安装或者已经存在,将会将其删除并重新安装。如果不存在则直接安装。
def install_source_of_pod(pod_name)
  pod_installer = create_pod_installer(pod_name)
  pod_installer.install!
  @installed_specs.concat(pod_installer.specs_by_platform.values.flatten.uniq)
end
当拿到PodSourceInstaller实例对象对象之后,通过 install!方法内部调用 cocoapods-downloader 组件将Pod对应的Source下载到本地. 文件路径为 cocoapods-1.11.3/lib/cocoapods/installer/pod_source_installer.rb.
module Pod
  class Installer
    class PodSourceInstaller

      def install!
        # download_source 内部会调用 Downloader.download 进行下载.
        download_source unless predownloaded? || local?
        PodSourcePreparer.new(root_spec, root).prepare! if local?
        sandbox.remove_local_podspec(name) unless predownloaded? || local? || external?
      end

    end
  end
end
然后通过上述流程大部分的依赖都会下载到 ~/Library/Caches/Cocoapods/Pods/Release/ 这个文件夹中. 然后从这个文件夹中把需要的依赖复制到项目的 Pod 文件夹下, 至此, dependencise download 过程就整体完成了.
validate targets 验证 Targets
validate targets 主要是用来验证先前流程中的产物(Pod 所生成的 Targets)的合法性, 主要代码就是构建TargetsValidator实例,并且执行 validate!.
    def validate_targets
      validator = Xcode::TargetValidator.new(aggregate_targets, pod_targets, installation_options)
      validator.validate!
    end
最终我们需要查看 TargetsValidator 中的 validate! 方法,文件路径为 cocoapods-1.11.3/lib/cocoapods/installer/xcode/target_validator.rb
module Pod
  class Installer
    class Xcode

      class TargetValidator

        def validate!
          verify_no_duplicate_framework_and_library_names
          verify_no_static_framework_transitive_dependencies
          verify_swift_pods_swift_version
          verify_swift_pods_have_module_dependencies
          verify_no_multiple_project_names if installation_options.generate_multiple_pod_projects?
        end

      end
    end
  end
end
其中合法性的验证主要有以下五项.
-
verify_no_duplicate_framework_and_library_names
验证 framework 是否有重名情况, 如果有冲突会直接抛出
frameworks with conflicting names异常. -
verify_no_static_framework_transitive_dependencies
验证动态库是否包含静态库,如果包含静态链接库 (.a 或者 .framework) 依赖,如果存在则会触发
transitive dependencies that include static binaries...错误。 -
verify_swift_pods_swift_version
验证Swift Pod 的 Swift版本正确配置且相互兼容.
-
verify_swift_pods_have_module_dependencies
检测 Swift 库的依赖库是否支持了 module,这里的 module 主要是针对 Objective-C 库而言。
-
verify_no_multiple_project_names
假设生成的Pod项目是否含有重复的名称.
Integrate 生成工程
工程文件的生成是最后一步.他会将之前版本仲裁后的所有组件通过 Project 文件的形式组织起来,并且会对 Project 中做一些用户指定的配置。
def integrate
    generate_pods_project
    if installation_options.integrate_targets?
        # 集成用户配置,读取依赖项,使用 xcconfig 来配置
        integrate_user_project
    else
        UI.p 'Skipping User Project Integration'
    end
end

def generate_pods_project
    # 创建 stage sanbox 用于保存安装前的沙盒状态,以支持增量编译的对比
    stage_sandbox(sandbox, pod_targets)
    # 检查是否支持增量编译,如果支持将返回 cache result
    cache_analysis_result = analyze_project_cache
    # 需要重新生成的 target
    pod_targets_to_generate = cache_analysis_result.pod_targets_to_generate
    # 需要重新生成的 aggregate target
    aggregate_targets_to_generate = cache_analysis_result.aggregate_targets_to_generate

    # 清理需要重新生成 target 的 header 和 pod folders
    clean_sandbox(pod_targets_to_generate)
    # 生成 Pod Project,组装 sandbox 中所有 Pod 的 path、build setting、源文件引用、静态库文件、资源文件等
    create_and_save_projects(pod_targets_to_generate, aggregate_targets_to_generate,
                                cache_analysis_result.build_configurations, cache_analysis_result.project_object_version)

    # SandboxDirCleaner 用于清理增量 pod 安装中的无用 headers、target support files 目录
    SandboxDirCleaner.new(sandbox, pod_targets, aggregate_targets).clean!
    # 更新安装后的 cache 结果到目录 `Pods/.project_cache` 下
    update_project_cache(cache_analysis_result, target_installation_results)
end
write lockfiles 写入依赖
当生成工程完成之后,就需要写入依赖,将依赖更新写入 Podfile.lock 和 Manifest.lock. Podfile.lock 和 Manifest.lock 也是后期版本对比与更新的重要文件. 可以认为 Manifest.lock 是 Podfile.lock的副本文件.
    def write_lockfiles
      @lockfile = generate_lockfile

      UI.message "- Writing Lockfile in #{UI.path config.lockfile_path}" do
        @lockfile.write_to_disk(config.lockfile_path)
      end

      UI.message "- Writing Manifest in #{UI.path sandbox.manifest_path}" do
        @lockfile.write_to_disk(sandbox.manifest_path)
      end
    end
perform_post_install_action 结束回调
最后一步为所有插件提供 post-installation 操作以及 hook.
def perform_post_install_actions
    # 调用 HooksManager 执行每个插件的 post_install 方法
    run_plugins_post_install_hooks
    # 打印过期 pod target 警告
    warn_for_deprecations
    # 如果 pod 配置了 script phases 脚本,会主动输出一条提示消息
    warn_for_installed_script_phases
    # 输出结束信息 `Pod installation complete!`
    print_post_install_message
end
至此,整个pod install的过程就算完成了.
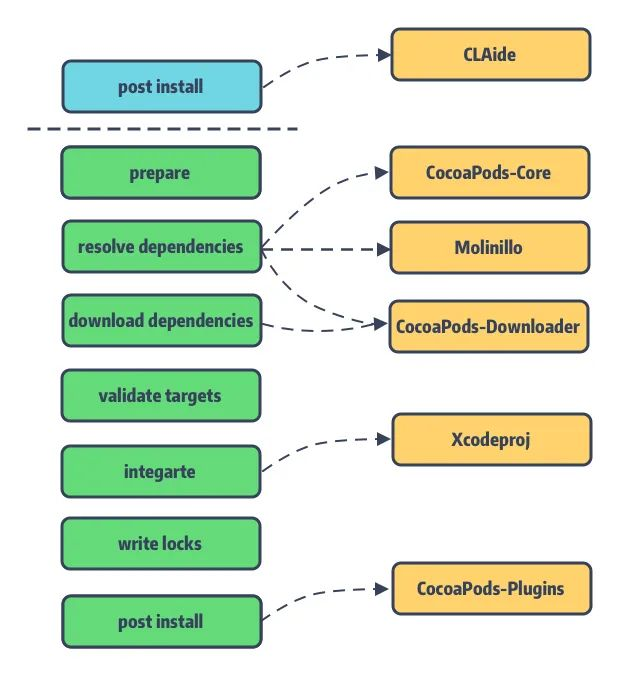
借用 整体把握 CocoaPods 核心组件 中组件依赖图,我们可以看到所有核心组件在 pod install 发挥的作用.
Comments | 0 条评论